


How to Identify and Specify Your Standing Rigging Components
To confidently specify a replacement for any element of your standing rigging, you will need to know what your existing components are called and how they are measured.
Some end fittings have generic names, e.g. T-terminal and some have more than one common name, but this guide will help you to recognise which ones are correct for your rigging.
The initial task is to take some basic measurements.
A good tape measure combined with a good eye may be sufficient, but vernier scale callipers will guarantee an accurate result.
Digital versions are now available at a very affordable price, making the process very simple to read and record.
Measure your wire
It is essential to establish the diameter of your wire because all the different types of wire termination are manufactured with specific dimensions for each diameter.
Confirm Hole Diameters and Pin Sizes
It is critical to the load-bearing capacity of the rig that the holes and clevis pins are closely matched together without any play.
Ordering terminals with pins that are too large for their allotted holes onboard will either mean some awkward drilling/reaming or starting the ordering process again.
N.B. Special care should be taken to ensure that there will be sufficient material left on the tang/eye/plate if you intend to enlarge any holes.
Establish the thread size, type and direction
Wire terminals that have a thread for connecting to the next component are known as studs.
Stud terminals are denoted first by the wire diameter and then the thread type and size because each wire diameter can have more than one thread option.
The thread options are generally referred to as downsize, standard and upsize - these are broadly categorised in the same way by all the manufacturers.
UNF thread is the most common in the UK, but Metric is always a possibility - bear in mind that the yacht or the mast may have originally been built in Europe where metric threads are more prevalent.
Stud terminals are typically Right-Hand thread, but it is worth checking, especially if they are metric thread on a French-built mast.
This table shows the normal UNF thread sizes for each wire diameter:
| Wire Diameter | Downsize | Standard | Upsize |
|---|---|---|---|
| 3mm | x | 1/4" | x |
| 4mm | 1/4" | 5/16" | 3/8" |
| 5mm | 5/16" | 3/8" | 7/16" |
| 6mm | 3/8" | 7/16" | 1/2" |
| 7mm | x | 7/16" | 1/2" |
| 8mm | x | 1/2" | 5/8" |
| 10mm | x | 5/8" | 3/4" |
| 12mm | x | 3/4" | 7/8" |
| 14mm | x | 7/8" | 1" |
This table shows the normal Metric sizes for each wire diameter:
| Wire Diameter | Downsize | Standard | Upsize |
|---|---|---|---|
| 3mm | x | M6 | x |
| 4mm | M6 | M8 | M10 |
| 5mm | M8 | M10 | x |
| 6mm | M8 | M10 | M12 |
| 7mm | x | M12 | x |
| 8mm | x | M12 | M16 |
| 10mm | x | M16 | x |
| 12mm | x | M20 | x |
| 14mm | x | M22 | x |
Note that there is no natural metric equivalent to 7/16" i.e. there is no M11 size.
Check for anomalies
The stud terminal on the end of the wire is ordinarily right-hand thread, while the bottom part connecting to the deck is typically left-hand.
We do occasionally come across a rig where the thread direction on the existing fittings is opposite to normal.
Opposite rotation is an odd feature which sometimes occurs with metric thread on some French-built masts, e.g. Z-Spars, and Isomat.
An Opposite UNF thread is very rare and will entail changing the whole turnbuckle to avoid a bespoke solution.
You can avoid any mishaps with thread specification by replacing your studs and turnbuckles together.
The direction of the thread is only of vital importance if you are planning to change the stud terminal but keep the existing turnbuckle.
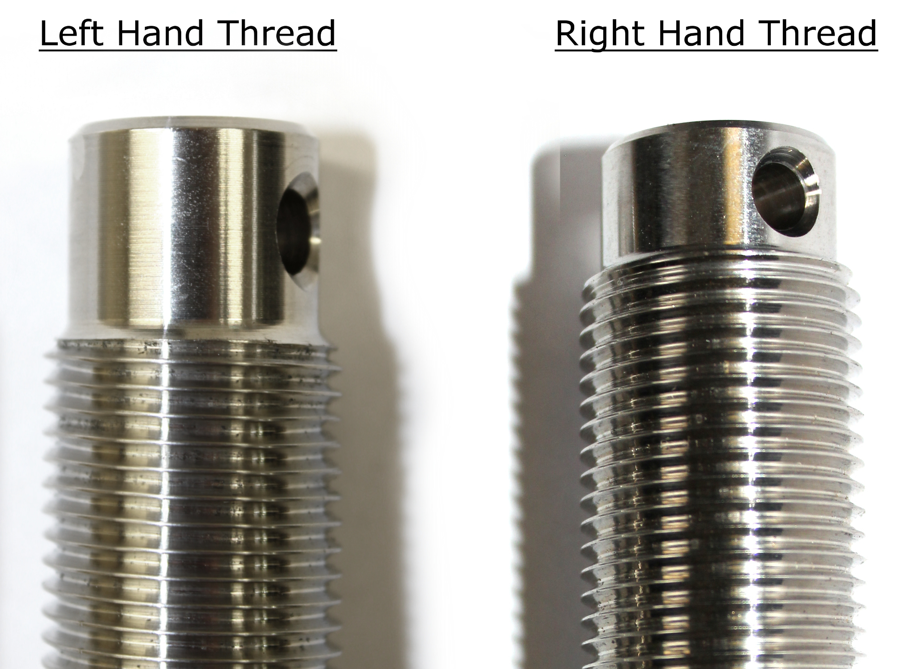
Take a close look at the two different threads in the picture below.
The higher side denotes the direction of the thread.
Attachment to the Mast, the top terminals
The top terminals that attach to the mast vary according to the origin (manufacturer) and the age of the mast.
It is also important to bear in mind that there may have been some significant alterations since your yacht was first commissioned.
The primary formats for swaged ends are Fixed Eye, Fixed Fork and T-terminal.
There are additional developments of these three concepts:
- Strap Toggle - also known as a Toggle Fork, development of the fixed fork - features a transverse bar with an articulating fork attached - for attachment to a mast plate with a hole drilled through it, also known as a mast tang
- Shackle Toggle - development of the simple eye featuring a permanently attached D shackle - for attachment to a mast tang
- T-terminal is a generic term for all the different forms of shroud attachment favoured by mast manufacturers, both current and historic - T, T-Bar, Flathead, T-Ball, Stemball, also known as Elephants Foot, Stemball with Cup, Spoon and Shroud terminal are all variations on this theme.
T-terminals are the trickiest identification recognition issue you will face. It is also essential to get it right so that your new terminals sit properly in their appropriate mast slot.
The fittings may look similar, but if they are not specified correctly, they may not fit the slot properly.
Even though it may not immediately be apparent, incorrect seating can lead to stainless steel fatigue which, in turn, may cause premature failure.
If your existing fittings don't match the available replacements, it will be prudent to fit new, matching plates on the mast.
Photos will help, but detailed dimensions are essential to ensure correct identification.
If practicable, send a sample fitting or wire stay to the Jimmy Green Rigging Team.
We can relieve you of the responsibility by positively matching your existing terminal to the correct replacement.
Of course, you are welcome to label all your rigging, pack it up and send it to us to replicate.
If you live near enough, you can bring the rigging yourself and discuss it with our Rigging team, it will be well worth the trip :-)
Attachment to the deck, the bottom terminals
Decide whether you are going to replace the turnbuckles (rigging screws) or just the end terminals.
If the turnbuckles are the same age as the rest of the standing rigging, or they show any signs of fatigue, starting afresh with all new components will be prudent.
Keeping your existing turnbuckles
Check the thread type (UNF or Metric) the thread size (standard or upsize), and, to make sure, the thread direction.
Replacing your turnbuckles
Check the thread size (standard or upsize)
Select a turnbuckle which provides articulation e.g. a toggle fork at the bottom end. This will help to prevent metal fatigue.
Check the dimensions of the fixing points for your shrouds and stays, traditionally known as Chain Plates:
- Hole diameter - to ensure the new pins will fit correctly
- The distance between the hole and the top of the fitting - check that the new fork fitting has enough depth to accommodate the chain plate without obstruction. This is especially important for the forestay attachment if it is an integral part of the stemhead fitting.
- The thickness of the chain plate - check that the new fork is wide enough to fit over the chain plate, but not so wide as to cause a pinpoint load or allow too much lateral movement.
Methods of Termination - Swage, Swageless and Talurit
The picture below shows a swageless eye terminal (top), a Talurit eye (middle), and a swage eye terminal (bottom).
Swageless terminals are characterised by a short overall length and a relatively wide body diameter.
Talurit is the process of pressing the wire in a soft copper ferrule.
Swages are slim and relatively long overall.

On DayBoats, Trailer Sailers and small yachts, a standard 1x19 wire can be bent around a stainless-steel thimble, and Talurit pressed into position using a copper ferrule.
Talurit Facts and Features:
- only available on wire up to 6mm diameter, because larger diameters are not flexible enough to turn around the tight radius of a thimble without detrimental deformation
- the most economical method for professional wire termination
- Ideal for fitting onto oversized pins and attachment points with the addition of a stainless steel thimble
- can also be used to form a loop for masthead attachment
Swaging is the most popular type of wire termination:
- The wire is inserted into the hollow terminal and pulled through a set of roller dies.
- Stainless steel is not a malleable metal, so the pressure applied by the roller dies is exceptionally high, creating a solid bar of material.
- Once swaged, the terminal cannot be re-used or positionally adjusted.
Swageless self-fit terminals utilise mechanical compression to grip the outer strands of the wire onto a cone or wedge:
- DIY friendly for the practical-minded
- only hand tools are required for installation
- can also be completely disassembled and reused (some models require inner cone replacement) providing great longevity
Manufacturing Process - Machined, Forged, Tapped and Formed
Swaged terminals are manufactured using 1 or more of the four processes listed above.
Machined:
- Milled from a solid piece of material
- can be manufactured to precise tolerances
- the waste material can be recycled to create further parts
- chunkier appearance than forged parts because the internal grain of the material remains parallel, requiring some faces to be longer to retain strength.
Forged:
Some Petersen Stainless terminals are manufactured using a process known as electrical upset forging.
The electrical current used internally aligns the grain structure of the stainless steel.
The result is a stronger, lighter fitting that is also more resistant to loading fatigue.
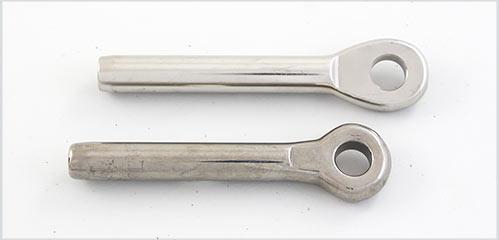
The picture shows a machined eye (top) which is slightly larger than the relatively minimal forged eye (bottom) for the same size wire.
Tapped and Formed:
Some Swage and Swageless terminals are made of several components.
These parts may be tapped together like the strap toggles below.
Different Types of Terminal
The picture below shows the most common rigging terminals used at Jimmy Green Marine.
From left to right, Talurit Thimble Eye, Fixed Eye, Shackle Toggle, Stud, Stemball (Elephants foot), Toggle Fork, the toggle fork on the bottom of a rigging screw, Fixed Fork, Hamma Spoon, and Flat Head.
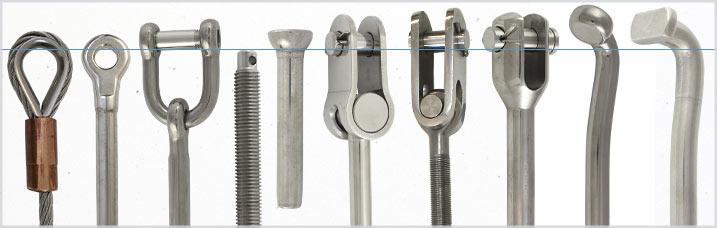
The line denotes the measurement point used by the Jimmy Green Rigging Team.

If a rigging screw is supplied as part of a finished wire, the measurement will be made with the screw two-thirds open, as shown below.
Pay Special Attention to T-terminal Selection
T-terminals or shroud terminals often provide the most difficult decision.
There are T-terminals on the market, such as the Sta-lok and OS/BSI varieties, which are sometimes referred to as universal.
This means that they are designed to fit various backing plates and may prove to be a useful resource if your existing terminals can't be replicated.
However, it is best to match the T-terminal to the mast backing plate from the same manufacturer.
The thickness and width of the head, as well as the angle of the load-bearing 'shoulders', are all critical factors in selecting the correct version.
If you are in any doubt about replicating your existing T terminals, please take some close-up photos with dimensions - the width, shoulder length and overall depth of the T shape.
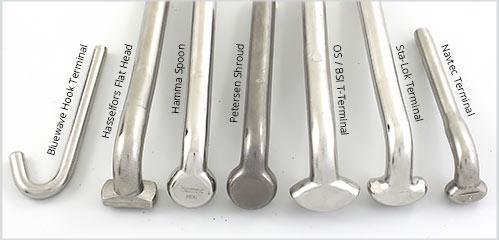
Illustrations from left to right below:
Bluewave Hook Terminal, Hasselfors Flathead, Hamma spoon, Petersen shroud terminal, Sta-Lok T-terminal, OS/BSI T-terminal and Navtec T-terminal (now discontinued).
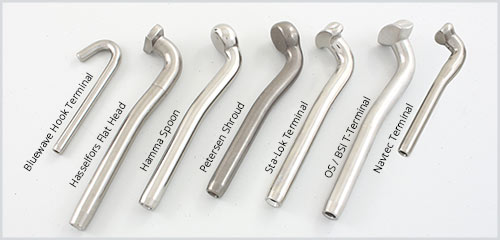
The Hamma Spoon and Petersen Shroud terminals are designed as direct replacements for the discontinued Navtec T-terminal.
N.B Selden T terminals are similar in size and shape to the Hasselfors Flat Head design.
The picture below reveals the variation in thickness and head angle to the swage.
Choose your Rigging Screws.
Jimmy Green Marine commonly supplies three types of rigging screws for standing rigging.
These are sometimes referred to as bottle screws or turnbuckles.
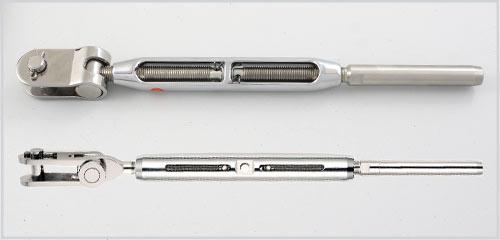
The Sta-Lok version (top) is the most popular choice, utilising a chrome-plated, forged bronze body.
The Supajust Eye Toggle and Swage (bottom) is a high-specification stainless steel open-body turnbuckle. Threaded Bronze Inserts ensure superb adjustment without seizing or galling and the swivel toggle action allows full articulation in two planes.
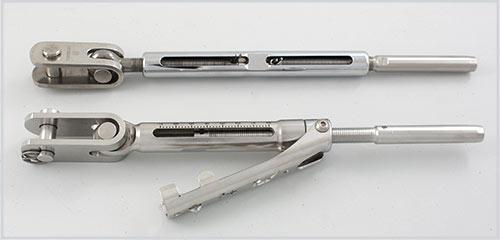
The slightly more expensive Petersen Stainless version (top) is machined from an aluminium bronze bar with the open centres offset drilled from both sides, making it 20% lighter than forged equivalents and equally strong.
The Bluewave turnbuckle (bottom) is for racing enthusiasts who want to easily adjust settings on the water. This turnbuckle features calibration, one extra-long stud and a fold-out arm to facilitate easy adjustments.
UNF is the standard thread for standing rigging turnbuckles.
Metric threads are possible on European manufactured masts - replacements are available.
Switching to UNF is a good idea if you are replacing a complete stay because replacement components will be easier to procure.
Imperial wire is also rare in Europe but readily available in North America.
Imperial components can be sourced but generally attract a bespoke quote and much longer lead times.
Overall, if you have a part that is not listed here, email a photo to the Jimmy Green Rigging Sales Team, and we will take a look.