


Anchorplait Splicing Instructions
Anchorplait® is a Jimmy Green Marine UK registered Trademark design featuring the Jimmy Green designed Easy-Splice Markers.

Anchorplait® to Chain Splice, 11 links
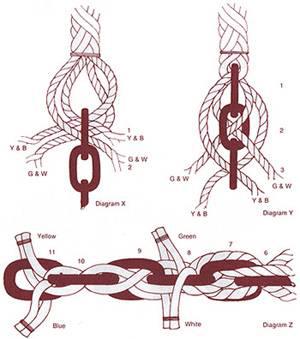
- Tie a short whipping or constrictor knot around the Anchorplait, the equivalent of 14 links of chain from the end.
- Unlay the rope back to the mark, keeping the pairs taped together so that you have four working ends.
- Thread all four ends through the first link, crossing them in figure X.
- Thread the green and white pair through link 2 and the yellow and blue through link 3 (One from each side as in figure Y).
- Continue alternate links with each pair until the green and white are through links 1, 2, 4, 6 and 8, and then disregard - and the yellow and blue are through 1, 3, 5, 7, and 9.
- Now split the yellow and blue parts into four separate strands and thread these through link 10, crossing them as in link 1 (two from each side) and then similarly through link 11.
- Whip and heat seal the ends together around the outside of the links, each to its own colour (i.e. yellow to yellow, blue to blue, green to green and white to white) (As in figure Z).
N.B. You may, if there is sufficient room in the links, repeat step 3 until link 9 (disregarding steps 4 and 5), continuing at step 6
Anchorplait® Eye Splice
Unlay the rope sufficiently to form the splice, keeping the strands in pairs.
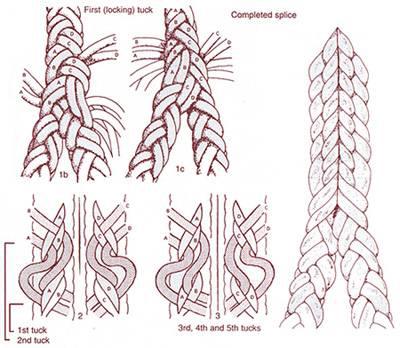
DIAGRAM 1b EYE SPLICE
First (Locking) Tuck - tuck the yellow and blue strands as a pair under yellow and blue - and green and white strands as a pair under green and white.
DIAGRAM 1c
Turn over and repeat
DIAGRAM 2
Second Tuck - take each working strand separately and tuck under its own colour (i.e. yellow under yellow etc.) N.B. Make sure you have made the first tuck correctly so that the second tuck can be completed without the working strands having to cross each other. Turn over and repeat.
DIAGRAM 3
Third Tuck - continue tucking each working strand under its own colour, still ensuring that the strands do not cross one another.
Fourth and Fifth Tuck - same as the third tuck (Not necessary in back splice). N.B. In practice, you will notice that you usually do five tucks in three pairs but only four in the remaining pair.
STEP 4
Sixth Tuck - To taper the splice, disregard yellow and green strands and continue the next tuck with blue and white only, each under its own colour.
STEP 5
Seventh and final tuck - with the blue strands, tuck under both blue and yellow and then disregard.
STEP 6
Continue two more tucks white under white and finish the final tuck under both green and white. Cut all ends and heat seal.
Anchorplait® Back Splice
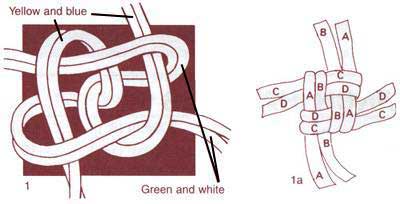
Unlay the rope sufficiently to form the splice, keeping the strands in pairs.
1 - Back Splice start with a four-part crown knot.
1a - Completed crown knot ready for back splicing - now make locking tucks and continue as for eye splice.
Tools Required - whipping twine, tape, knife or scissors, Swedish fid and lighter.