For those of us who have given our heart and soul to sailing, the time will likely come when we have got to tackle a re-rig. Maybe, it's for a second-hand boat just purchased, or for a trusty yacht we've been sailing for years. Either way, a due rigging replacement is not something to be postponed – that is, if we want to keep our mast upright, and our expeditions free from major mishap! When the moment does arrive, the thought of replacing the standing rigging might seem daunting. It is however a task that most can master, by following a few simple steps. In fact, the key here is in the preparation. So, without further ado, here is our checklist for taking on a trouble-free re-rig.
Before you get started
Ahead of getting things underway, you will need to start by grabbing a few bits and pieces. A good pair of callipers, tape for marking, note paper, labels, a tape measure, and all-importantly a camera. These tools and materials are going to be your allies. You will also need to decide whether you are going to have the mast up, or mast down, during the re-rigging process. If practicality allows, dropping the mast will mean the convenience of being able to purchase new wires with both ends finished, and a much easier job of fitting them onto an accessible horizontal mast. If your mast must remain stepped for the re-rigging process, you will be going aloft in a bosuns chair, and finishing wires in situ. In either case, Jimmy Green Marine can accommodate your needs, and our rigging team are ready to guide you through your purchasing process, should you so wish.
- Collect equipment for measuring and recording you rigging requirements
- Decide if your re-rig will be performed with mast up or mast down
Make an assessment of your current rigging
Before ordering a duplicate set of rigging for your craft, it makes sense to ensure that you are copying an optimal rig. It is time to perform a rig tune and tension check on your current rigging, check for any adaptations that have been made, and then weigh up whether further alterations would be beneficial. Assessing your current set up means testing performance both upwind and downwind on both tacks/gybes, confirming correct tensioning, mast rake and bend, and athwartship vertical alignment. If in doubt, seek professional guidance.
Examine whether toggles or shackles have been added to create extra length, which may not be required with a longer wire. Explore for any signs of wear that may indicate current design flaws, such as misalignment, or inappropriately sized clevis pins. It is preferable to avoid duplicating a problem. Especially if the issue was the cause of the need to re-rig in the first place!
Consider your intended use – for example, whether your plan features ocean cruising, racing, or coastal sailing, and whether this is best reflected in the current rig design. Your goal is a rig as closely optimised as possible for your anticipated activities, within parameters that will allow for fine-tuning once the new rig is in place.
- Perform rig tune and tension check of current rigging
- Look for opportunities for improvement
- Take intended use into account
Measure and record for re-rig success!
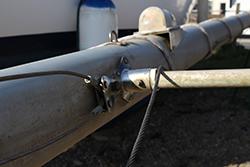
Before you begin to think about disconnecting any shrouds or stays, your first duty is to measure and record. What you do now will not only ensure that you order exactly what is required, but also that reassembling your rig is a doddle. Your goal is to compile a list of all components, and associated tension settings, all the while taking photographs that will later guide you. Using callipers, record exact measurements of wire diameters, terminal types and sizes, hole sizes and clevis pin diameters. Note down all of the turnbuckle settings, either by marking them with tape, taking a photograph, or both.
Keep in mind that when you later come to loosen those turnbuckles to remove the rigging, you will want to re-tighten it to the correct settings before measuring the wire length. As you take photographs, make the most of your zoom, and get in every detail – it is always better to have too much information than not enough. Using a measure, record all wire lengths, going from bearing edge to bearing edge of the pins or eyes. Remember to label each stay as it comes off the mast, for handy referral later. If measuring wires loose, be sure to hold them at full length, as taught as possible.
- Measure and record all rigging components
- Take note of and mark tension settings
- Take photographs of each element in detail
- If in doubt, measure twice!
Placing Your Order
By this stage in the process, you will be more familiar with your rig than ever before – making this the perfect moment to double check if there are any possible improvements to make. This might mean a set up alteration, or simply a change of fittings. With every “t” crossed and every “i” dotted, your next steps are going to draw from that decision made earlier – whether the mast will be down, or still stepped, for the re-rigging process.
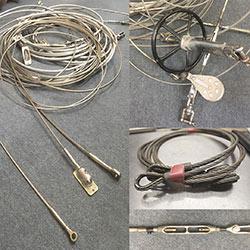
If the mast is unstepped, you will be able to order wires with both ends swaged with terminals and studs. If this is the case, you have two options. Either email your full list of requirements to the Jimmy Green team, and we will compile your order, or coil and label your stays – being sure to note any amendments you want made – and send them to the team. In the case of the latter option, our team will set about measuring and duplicating your rigging to your exact specifications. Either way, our standing rigging custom build instructions page will help you navigate the ordering process.
If your mast is to remain stepped, your new wires will need to be swaged with top terminals only and be slightly over-length so that you can cut and fit them in situ. Each new wire will need an accompanying DIY self-fit swageless (mechanical) terminal for the bottom end. You will be trimming and fitting wires to an optimal adjustment position – usually and ideally 2/3 open. We commonly recommend swageless terminals from Sta-Lok or Petersen for convenient DIY fitting. Keep in mind that replacing the forestay usually presents the most substantial challenge during stepped re-rigs and is the one area in which you may require professional assistance.
- Double check your compiled order list, including improvements
- Order either fully swaged for an unstepped re-rig, or partially swaged for a stepped re-fit.
Following a thorough assessment and recording process of your current rig, you will have all the information you require to re-fit your prized yacht with its handsome new rigging. For more details, including how to get an idea of re-rigging costs, explore the helpful information laid out on our standing rigging shop page, and find in-depth guides via our standing rigging assistance page. The Jimmy Green Marine team is always on hand if you have any questions ahead of placing your re-rig order, so feel free to contact us today with any queries!


 Back
Back